We are going to make a very simple "div" based layout.
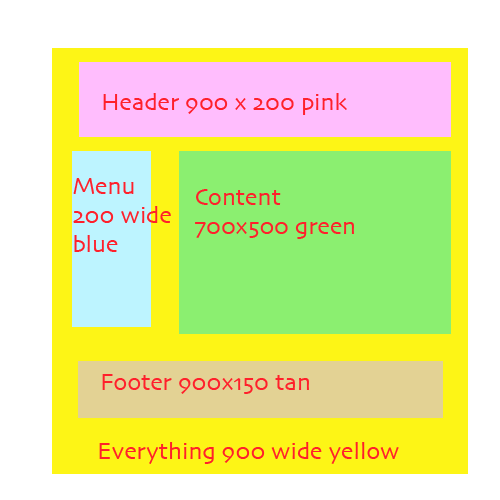
Before we start, let's plan. We are going to have a page that is 900 pixels wide. This is going to be our bounding box and all the other divs will be inside this div, which we will name "everything".
We are going to have a header area that is 900 x 200 pixels, a menu area that is 200 x 500 pixels, a content area that is 700 x 500 pixels, and a footer that is 900 x 150 pixels.
Here's the general plan:
We will make this by making a bunch of divs. Each div will have a name as shown in the diagram. Then we will make rules that match and set the options.
When you first make the divs, they won't layout right, so we have to use a trick to make the menu and content place themselves correctly. The trick is that you use the "float left" and "float right" options to set the alignment for each of the divs.
Here's a diagram showing how that works:

The green area will be aligned right, and the blue area will be aligned left. Header and footer will also be aligned left.
Here are the rules we want to make, in plain English. The # sign means that this is the name of the div. Float is the alignment for the sections.
#header
pink
900x200
float left
#menu
200x500 piexels
blue
float left
#content
700x500
green
float right
#footer
tan
900x200
float left
And of course we need to make a rule for the "everything" div that holds everything in it:
#everything
900 pixels wide
color yellow
We won't set the height, it will be set automatically as big as it needs to be to hold all the divs we have made.
Remember, all the names have to match exactly to the names of the objects.
Up to now we have drawn and typed nothing, we're just planning.
I'm going to create my divs by typing. You can also use the insert option in the Dreamweaver menu, but for me typing is faster. Type the following into the body area.
<div id="everything">
	<div id="header">
   	i am a header
   </div>
	<div id="menu">
   	i am a menu
   </div>
	<div id="content">
   	I am an example of how to do layout with css rules and divs.
   </div>
	<div id="footer">
   	footer
	</div>
</div>
When I typed this up, I indented some of the lines to show the pairs of tags and which element is inside which div. This makes it easier to catch errors.
Go back to the section where we planned the colors and sizes for each of our named regions (divs).
For each div, there will be a rule. Hit the "+" button on the CSS Styles panel, which creates a new rule. The "+" button is small and is shown in the lower left of this picture:
After clicking "+", the "CSS Rule definition" window will come up.
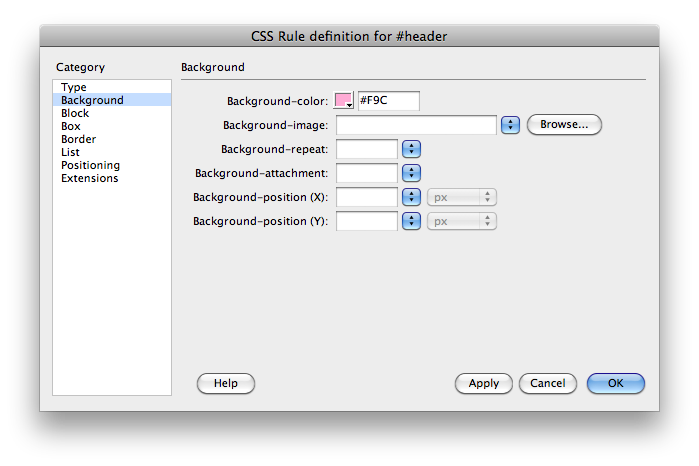
To set the background color, click background, then click "Background-color", as shown below:
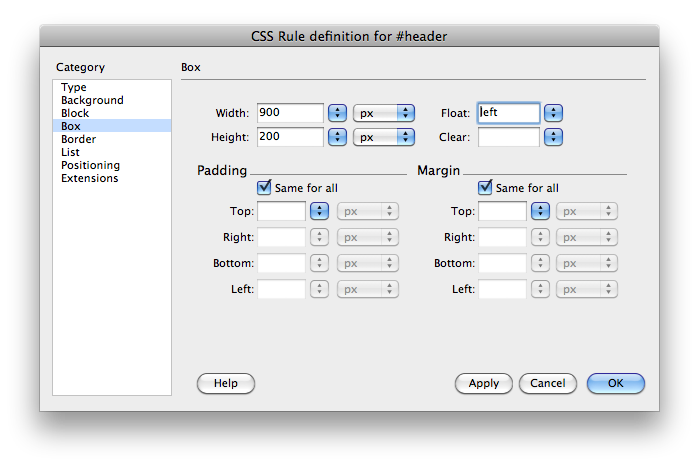
Here's how to set the box size and float left or float right, both of which are found in the "box" options.
If you make a mistake in one of your rules, you can edit the text by hand, or you can select the rule and then click the pencil icon which brings the rule back up in the CSS Rule Definition window.
Here's what the HTML version of your rules should look like:
<style type="text/css">
<!--
 #header {
 background-color: #F9C;
 height: 200px;
 width: 900px;
 float: left;
 }
 #menu {
 background-color: #6CF;
 float: left;
 height: 500px;
 width: 200px;
 }
 #content {
 background-color: #6f6;
 float: right;
 height: 500px;
 width: 700px;
 }
 #footer {
 background-color: #996;
 float: left;
 height: 200px;
 width: 900px;
 }
 #everything {
 background-color: #FF6;
 width: 900px;
 }
 -->
</style>
All of this was created by the drag and drop interface of Dreamweaver, but of course you could also type it by hand.
Save everything. Then click the little earth icon to display the page in your browser.
Here's the final result (click here)
